martes, 9 de septiembre de 2014

Bustos SteamPunk. Piloto de Tanques. (Vol II)

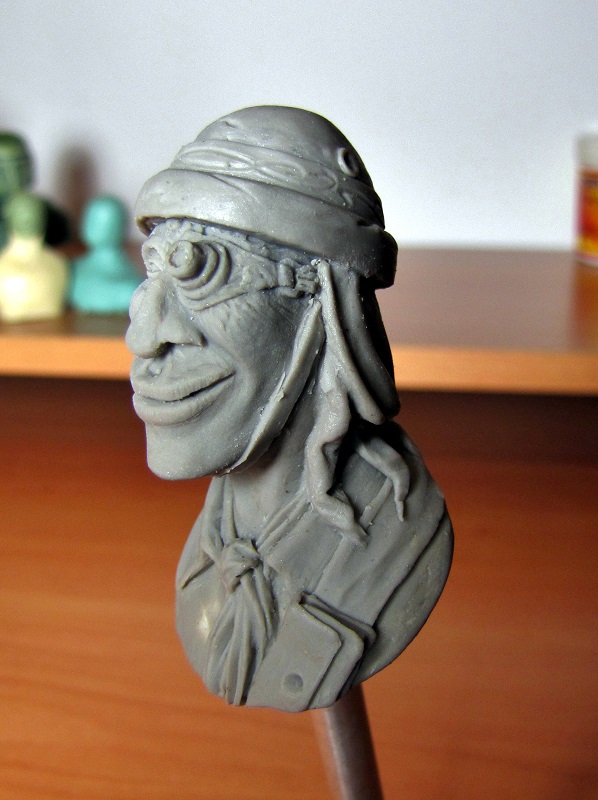
Definitivamente no sé que demonios estoy haciendo, si un tanquista steampunk, una estatua de la isla de Pascua (tal y como la ha definido uno de mis admiradores) con casco, un rastaman militarizado u otra cosa indefinible. Bueno dejemos que cada uno decida que es este personaje, lo importante es que yo estoy disfrutando mucho haciéndolo.

Definitely not know what the hell I'm doing, if a steampunk tank crew, a statue of Easter Island (as it has defined by one of my fans) with helmet, a militarized rastaman or something else indefinable. Well, let each one decide that this character is, the important is that I'm really enjoying doing it.

Veamos que le hemos hecho a mi pobre monstruíto. Le hemos puesto su uniforme y le hemos añadido su casco, que aunque no os lo creáis son, más o menos, fieles al original vestido por los tanquistas italianos hasta la 2GM. Con el casco me he tomado algunas libertades y le he añadido una decoración estilo Art Nouveau.

Let's see what we have done to my poor little monster. We've put his uniform and we have added his helmet, that although you may not believe are, more or less, faithful to the original dressed by Italian tank crews until WW2. With the helmet I have taken some liberties and I've added a Art Nouveau style decor.

Como le quedó un cabezón importante, y digamos que algo desproporcionado, le añadí una melena. Un burdo intento de compensar el tamaño de la cabeza. En fin... Le he puesto como parte de la correa del casco la base de lo que será un cacharro modernista, con ruedas y bombillas vintage que voy a hacer en "Green Stuff".

As finally he has a major head, and let´s say slightly disproportionate, I added him a mane. A crude attempt to compensate the size of the head. Anyway ... I've put him, as part of the helmet, a strap that will be the base of a modernist pileup, with wheels and vintage bulbs that I ´m going to make in "Green Stuff".

Y por ahora eso es todo.

And that´s all by the moment.


viernes, 5 de septiembre de 2014

Bustos SteamPunk. Explorador. (Vol II)

Algunos progresos, le reduje la mandíbula un poco, le retoqué la cara (nariz, pómulos y ojos), le he puesto un bigote victoriano y lo llevé al estilista. Por último le modelé el uniforme. Está practicamente terminado.

Some progress, I reduced him the jaw a bit. I retouched the face (nose, cheeks and eyes),I have added him a Victorian mustache and carried him it to the stylist. Finally I modeled the uniform. It is almost finished.

La idea es hacerle copias que vienen muy bien como regalos para familia y amigos. Ahora se podrá quedar así o añadirle algún gorro. Así podremos tener varias figuras diferentes. En principio le voy a hacer un gorro tipo 'foreign service helmet'.

The idea is to make copies that come in handy as gifts for family and friends. Now it can remain well or add it a hat. So we can have several different figures. In principle I'm going to do it a hat type 'foreign service helmet'.


miércoles, 3 de septiembre de 2014

Bustos SteamPunk. Explorador. (Vol I)

Otro busto Steampunk, este va a ir con salacot y la idea me viene un poco del Coronel Cockswine, es bastante más irreal que la anterior (el tanquista), a ver como acaba quedando. Para mi que tengo que lijarle un poco la quijada.

Another bust Steampunk, this will go with pith helmet and the idea comes to me a little from Colonel Cockswine, is far more unrealistic than the other one (Tank crewman), we will see how finally result. I think I have to sand a little the jaw.


Bustos SteamPunk. Piloto de Tanques. (Vol I)

Tenía mono de modelar y para colmo he estado metiéndome en un par de foros, a saber Planetfigures y Spanish Team, que me han puesto los dientes largos y aumentado mis ganas de darle caña a las figuras. Con el modelado me pasa lo mismo que con el dibujo, se me dan mejor las figuras no realistas, supongo que le pasará lo mismo a la mayoría de los que no tenemos una formación académica en Bellas Artes. Pero como se trata de aprender y coger soltura con los materiales y herramientas espero que no me tengan muy en cuenta la falta de realismo.

Really difficult to translate, Sorry!! In summary I´m going to make several non realistic busts...more or less...

Voy a adentrarme en el sórdido mundo del SteamPunk, he empezado con este fulano, que fue surgiendo sobre la marcha. Le voy a poner un casco de tanquista italiano de los años 30 pero con algún retoque Art-Deco. Bueno, ya veremos como evoluciona.

I'll go into the sordid world of SteamPunk, I started with this guy that came up on the fly. I´m going to give him an Italian helmet of tank crewman of the 30s, but with some retouching Art-Deco. Well, we'll see how it evolves.


jueves, 21 de agosto de 2014

Orcos Bandoleros/ Orcs Bandits (Vol.V)

El otro día, por fin, desempolvé la silicona y la resina y me puse a hacerle varias copias a mi brutito. También quería probar una forma de hacer peanas que se me ocurrío paseando por la playa de Cádiz, al ver fragmentos de roca desprendidos de los bloques de hormigón de protección que por allí hay. Muchos de estas piedrecitas tienen varios lados planos y me pareció que podrían ser unas peanas para bustos bastante originales. Después siempre que me he tropezado con algún pedrusco con la forma apropiada, ha acabado este en mi bolsillo, aumentando mi fama de chalao entre familia y amigos.

The other day I finally dusted off the silicone and the resin and began to make several copies to my little tough guy. I also wanted to try a way to make bases that I thought walking along the Cádiz beach, seeing rock fragments detached from the concrete blocks that there are for protection of shore. Many of these stones have several flat sides and I thought it might be a pretty original pedestals for busts. After, each time I've ever encountered a boulder with proper form, has finished in my pocket, increasing my reputation of mad between family and friends.

El molde lo hice bastante flexible y de una pieza para evitar las juntas, el problema es que se deforma al meterle la resina. La parte positiva es que si sabes jugar con él mientras endurece puedes conseguir formas distintas con el mismo busto, un orco mas gordo o más estilizado según aprietes el molde o le limites la deformación.

I did the mould quite flexible and one piece to avoid joints, the problem is that deforms when you put the resin inside. The upside is you can play with it while it hardens ,you can get different shapes with the same bust, fatter or slimmer orc depending if you push the mold or limit the deformation.

La peana no tiene misterio, buscas una piedra adecuada y con una broca de piedra, agua y paciencia le haces una hendidura. Después he usada tubo de latón para unir la figura a la piedra. Bueno, bonito y barato.

The pedestal has no mystery, you need a proper stone and with a drill for stone, water and patience will make a slit. Then I used brass tubing to link the figure to stone. Well, nice and cheap.


viernes, 28 de febrero de 2014

Curso-Tutorial Modelado de figuras. La Base II

Vamos a terminar de darle forma a la base, para ello a la figura en pasta de papel le empezamos a añadir masilla epoxidica, yo he usado Milliput silver-grey porque tenía ganas de probar a ver si había algún cambio sustancial con la Milliput standard, y la verdad es que yo no se le veo, ¡ojo! eso no quiere decir que no lo haya. Esto fase es mucho más económica hacerla con masilla epoxídica de los chinos, esta para reparar cosas o con otra masilla de epoxi que os podais agenciar.

We will finish shaping the base, for it we will begin to add epoxy putty over the dry Das putty.

Yo voy por aproximaciones, primero le doy un tiento para ver como va quedando, espero que se seque y vuelvo a la carga. Tiene que ser asi porque si pretendes hacer toda la figura a la primera (cosa que si se te da bien es perfectamente posible), como la masilla está blanda cuando le has dado forma a una parte y vas a otra, le acabas poniendo encima la manaza a la parte que acabas de modelar y te la cargas.

I work by approximations, first I give it a first touch to see how it progress, I wait that it dries and back to the work. It must be so because if you intend to do the whole figure at the first time (what it is perfectly possible if you are a good modeller), it´s quite possible you finally smash the work done by mistake, due to the putty is still soft.

Esta es la primera aproximacion, la hice hace tiempo durante un día de vacaciones y no me moleste en sacarle fotos al proceso, se siente. Aqui podemos ver al comparar con los dibujos a escala, que parte está lista y cual necesita trabajarse un poco más.

This is the first approach, I made during a vacation day and I didn't bother to take pictures of the process, sorry. Here we can see, by comparing with scale drawings , that part is ready and what needs a little more work.

De frente y de espalda parece que hemos atinado con la forma, pero de perfil vemos que le falta un poco de cabeza por la parte posterior y que el pecho necesita un poco de masilla. Por otro lado en la cara nos hemos pasado un poco pero eso no es problema porque para eso inventó el Señor la lima y la lija.

Front and back seem ok, but seeing the profile it lacks a bit of back side of head and the chest needs some putty also. On the other side of the face occurs the opposite, we must to eliminate some part of the face. 


Hay que aclarar que estamos intentando representar la figura del tipo masculino ideal, o sea un cachas con los trapecios que le salen de debajo de las orejas, pechos a lo Swarzeneger, tableta de chocolate y ese tipo de cosas que les gustan a esas personas de mala vida que frecuentan los gimnasios. Si queremos hacer un canijo o un gordito sólo tenemos que añadir o quitar donde proceda.
Recordemos que el mazas del dibujo es sólo una referencia.

Should be clear that we are trying to represent the figure of the ideal masculine type, i.e. a guy with trapezoids that start under the ears, chest like Swarzeneger, chocolate bar and such things like these insane people who frequent gyms. If we make a skinny or chubby guy just need to add or remove where appropriate.
Recall that the drawing is for reference only.


Ahora tenemos que enmendar los defectos que hemos detectado y esto sí voy a intentar detallarlo un poco mejor:

We are going to fix the mistakes, and this time I would try to explain it better.

Hemos dicho que nuestro amigo tiene las tetillas caidas, pues pillamos la masilla y cortamos la misma cantidad de los dos componentes. El caso de Milliput son dos barritas cilíndricas, las pones en paralelo en tabla de corte y ¡Zas!. Luego es conveniente amasarlo bien, asi que te pones a darle vueltas y vueltas y aprovechas para echarle un ojo al foro, o a tu correo, o etc,etc. Si no se mezcla bien puede que no todo fragüe y te queden partes pegajosas y sin secar.

Cortamos un trozo a ojo, con las dimensiones aproximadas de lo que queremos cubrir

Take a piece with approximate dimensions of what we want to cover


Y manos a la obra, lo vamos pegando y dando forma con los dedazos. 

We stick it to the basis and shape it with fingers


Y vamos comparando con los dibujos, lo dejamos mas o menos con la forma...

And we compare with drawing...


... y pasamos ahora a a parte trasera de la cabeza, mismo proceso pegote de masilla y extendemos con los dedos dándole forma.

... the same process with back side of head.


Llegará un momento en que la masilla no se extienda bien y comience a agrietarse, entonces nos humedecemos los dedos en agua, esto conseguirá dos cosas, que acabemos de epoxi por toda la mano y que la masilla se alise perfectamente (Por cierto las zanahorias no le proporcionan ningún extra al proceso es que era el bote que tenía más a mano)

There will come a time when the putty does not spread well and starts to crack, then we moisten the fingers in water, we will get two things, first one we finish with epoxy all over the hand and second one the putty will be perfectly smooth. (Certainly carrots not provide any extra power to the process, it was the first jar I could take)


Ahora el proceso no tiene misterio y dependerá de vuestra habilidad, no hay trucos, vas extendiendo la masilla y le vas dando forma usando la figura en papel como referencia. Si se te acumula en un lado la presionas hacia otro o simplemente le quitas un poco. Id usando el agua con moderación, si la masilla está demasiado humeda no se trabaja bien.

Now the process has not mystery and it depends on your skill, no tricks. Spread the putty and shape it using the reference drawing. If you accumulate too much on one side, press the another or simply take away a little bit. Use water sparingly, if putty is too wet it isn't going to work well.

Como se dice siempre, y se dice porque es una verdad como un templo, hay que practicar, y practicar, y practicar. Y por otro lado hay que observar , y observar y observar. La mejor forma de ver como es el cuerpo humano, o una cara, es fijarte en la gente que tienes alrededor.

As is always said, and it is said because is really truth, you have to practice and practice and practice. On the other hand we must watch and watch and watch. The best way to see how is the human body, or a face, is to look at the people around you.

Además si alguien te pilla mirándole el culo siempre puedes decir: "No se ofenda es que soy un artista y voy a inmortalizar sus nalgas" o algo parecido.

And if someone catches you looking at their ass can always say, "No offense is that I am an artist and I will immortalize your buttocks" or something.


Y poco más que contar, el siguiente paso es el de sacarle un molde a la base para hacer copias en resina y no tener que repetir el proceso. Pero esa parte me la voy a saltar porque ya hay mucha literatura al respecto.

Next step is to build a mould to make resin copies to don't repeat the process. But that part I'm going to jump because there is much literature about it.

miércoles, 19 de febrero de 2014

Curso-Tutorial Modelado de figuras. La Base

Bueno colegas, tras un parón existencial en el que me he dedicado a otros menesteres, volvamos al lío. Vamos a construir la base de nuestra figura. La vamos a hacer a 1/9 para que sea más grandecita.

We are going to built the basis of our figure. We will make it in 1/9 scale.

1: Tomamos el dibujo a 1/9 de la proporciones masculinas. Será nuestra referencia. La primera consideración que debemos tener en cuenta es que estamos creando el esqueleto, la base sobre la que modelaremos la figura, por lo que debe ser en dimensiones menor que la figura representada en el papel. El volumen que vamos a hacer debe reservar espacio para la masilla que conformará definitivamente el personaje que queremos recrear.

We take the drawing to 1/9 of the male proportions. It will be our reference. The first consideration to keep in mind is that we are creating the skeleton, the basis on which we will model the figure, so it should be lesser than the figure depicted on paper, because over the basis we will definitely shape the character you want to recreate.

2: Construimos con alambre el contorno del busto. La cabeza, el cuello y un trapecio que vaya de los hombros a las tetillas. En el dibujo tenéis una linea a trazos que va del final de la clavícula al ombligo, usadla como referencia para hacer este trapecio.

We construct with wire the bust skeleton. The head, neck and a trapezius which cover from shoulder to nipples. In the drawing you have a dotted line that goes from the end of the clavicle to navel. Use it like reference to make the trapeze.


3: Con más alambre rodeamos el contorno dando volumen, yo no me como mucho la cabeza en esto, pero lo cierto es que cuanto más este currado esta base mejores resultados tendremos. La idea es que no sea un estructura muy rígida porque luego la deformaremos cuando apliquemos la masilla.

With more wire we surround the contour giving volume, I don't take too much care on this, but the truth is when you spend more time to do this basis you will get better results. The idea is to not do a very rigid structure, because we want to shape it after when we apply the putty.

Usaremos constantemente el dibujo para ver que no nos salimos y mantenemos las proporciones del cuerpo.

We will use constantly the drawing to see that we keep the proportions of the body.


4: Con la estructura terminada metemos en el interior trocitos de pasta de papel tipo Das. Yo estoy usando una que estaba bastante hecha polvo. No importa, su misión es ahorrarnos masilla de epoxi.
Lo de meter masilla dentro es para que la estructura de alambre no se deforme cuando empecemos a recubrirla con masilla, también de tipo Das.

With the structure completed we put inside pieces of paper pulp, like Das for example, their mission is to save epoxy putty. The reason to put in putty is to avoid to deform the wire frame  when we start to cover it with putty, also Das.


5: Empezamos a recubrir la estructura, si la estructura de alambre que hemos creado no tiene muchos nudos será mas o menos flexible y podremos ir dándole la forma humana usando los dibujitos (como seguramente ya habréis adivinado). Vamos aplicando pedacitos amasándolos con agua y comparando la forma con el dibujo. Y así una y otra vez hasta conseguir una base con proporciones humana.

We begin to coat the structure, if the wire structure, that we have created, hasn´t too many knots, it will be more or less flexible and we can go giving the human form, using the reference drawing (as you probably have guessed). We apply little pieces kneading them with water and comparing the shape with the drawing. We will do it again and again until to get a basis with human proportions.

Debemos tener cuidado de que la figura vaya quedando simétrica, que no tenga por ejemplo un hombro más grande o más alto que el otro, sobre esto no hay técnica que os pueda contar sino buen ojo y paciencia y usar el dibujo para ir contrastando.

We must be careful to make the figure symmetrical, as far as possible. To avoid our guy has a shoulder taller than the other. About this there is no technique that I can tell to you, only good sight, patience and use the drawing to compare. 


6: Bueno por ahora vamos a dejar la figura así, podéis comprobar que no hemos cubierto todo lo que sería el cuerpo, el motivo es que quiero hacer una base que en el futuro me sirva para hacer torsos desnudos o parcialmente desnudos. Si vamos a hacer figuras vestidas podemos llevar la masilla hasta el contorno que delimita el cuerpo desnudo, porque con el epoxi crearemos la ropa que sobre él se apoya.

By the moment we will leave the figure like that. Notice that we have not covered everything that would be the body, the reason is I want to make in the future a base that it serves me to make busts with partially naked bodies. If we are to do clothed figures we can take the putty to the edge bounding the naked body because the epoxy will create clothing that rests on it.


7: La base que yo estoy creando, la estoy haciendo con la idea de copiarla con un molde de silicona para reproducirla luego con resina. El motivo es simple y se trata de ahorrarme todo este paso.
Si no tenéis los medios para reproducir la base, o simplemente no os da la gana, sería muy recomendable que le añadáis a la parte baja del busto una estructura de alambre y masilla extra que os sirva como asidero para sujetar la figura mientras modelamos.

Si tenemos que hacer la camisa, chaqueta o armadura por ejemplo, lo ideal es hacerlo de una vez, cosa que será imposible si estamos agarrando la figura por el pecho. La figura debemos tocarla lo menos posible y usar este asidero para sostenerla.

8:Ahora debemos esperar que seque el Das y luego lo recubriremos con una capa de epoxi que sirva de paso para corregir errores, terminar de darle forma, etc.

Now we must wait for the Das putty dries, after we will continue with a layer of epoxy putty, then we will profit to fix errors, to finish shaping, etc.